Apple Power Yoga:
What is Apple Power Yoga?
Apple Power Yoga is ultimately a journey into philosophy the philosophy about who you are, what you are capable of, how your actions affect your life. Philosophy is the only medicine that ever “cures” us; it is the only means by which we can live at our full, incredible potential. I’m talking about the Apple power Yoga that comes from the bottom of heart no fears anything. I'm confident that ultimately it’s that connects you to the only power that matters in believe yourself. It focuses more on fast, powerful movements and builds more strength and muscular definition.Apple Power Yoga is directed at creating the highest level of energy,
Why You need Apple Power Yoga?
Apple power Yoga benefits:
The benefits of Apple Power Yoga include both mental and physical health. Apple Power Yoga increases body awareness, relieves stress, reduces muscle tension, strain, and inflammation, sharpens attention and concentration, and calms and centers the nervous system. So, you can get mental benefits. Apple power yoga can increase strength and flexibility your body and you can able to more physical activities. Each time you practice Apple power yoga, you take your joints through their full range of motion.
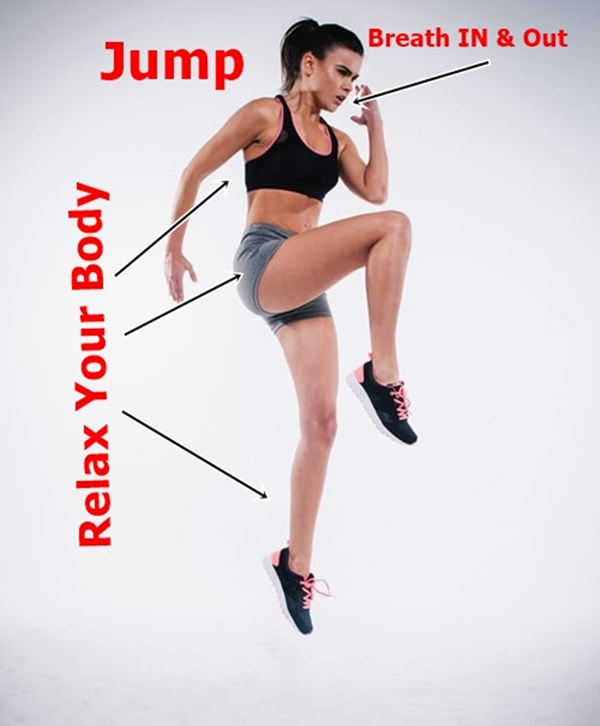
***1.Jump:
Take the deep breath 10 seconds and exhale. Proper stance and breath in & out normal. Get into a normal standing position, with your body facing forward and feet parallel. This fun whole body exercise is mostly used for warming up and instantly elevates your mood and activates various muscle groups. The rigorous calisthenics moves help improve your stamina, are a great exercise for the cardiovascular system, and relieve stress. Jumping Apple power Yoga is an aerobic cardio exercise, meaning, you use oxygen to meet the energy demands and stimulate the heart muscles. The heart has to work extra hard to pump enough oxygenated blood and also bring back the carbon dioxide loaded blood from the cells. This, in turn, helps exercise the heart muscles and other organs like the lungs.
Take the deep breath 10 seconds and exhale. Proper stance and breath in & out normal. Get into a normal standing position, with your body facing forward and feet parallel. This fun whole body exercise is mostly used for warming up and instantly elevates your mood and activates various muscle groups. The rigorous calisthenics moves help improve your stamina, are a great exercise for the cardiovascular system, and relieve stress. Jumping Apple power Yoga is an aerobic cardio exercise, meaning, you use oxygen to meet the energy demands and stimulate the heart muscles. The heart has to work extra hard to pump enough oxygenated blood and also bring back the carbon dioxide loaded blood from the cells. This, in turn, helps exercise the heart muscles and other organs like the lungs.
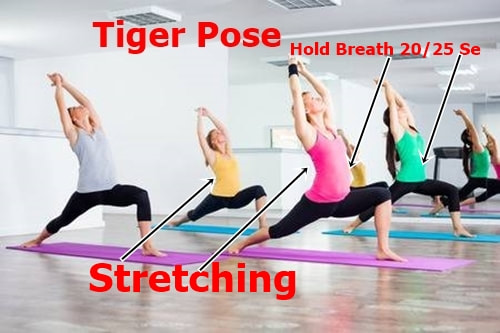
***2.Tiger pose:
Tiger Pose energizes the body and strengthens the legs, arms, and abdominals.
How to practice Tiger Pose:
From Down Tiger, step one foot forward between your hands
Stack your knee over your front ankle
Stay high on the ball of your back foot, keeping your back knee lifted
Engage your core to lift your torso
Raise your arms over your head, your palms facing center
Hold for 20-25 Se breaths on both sides
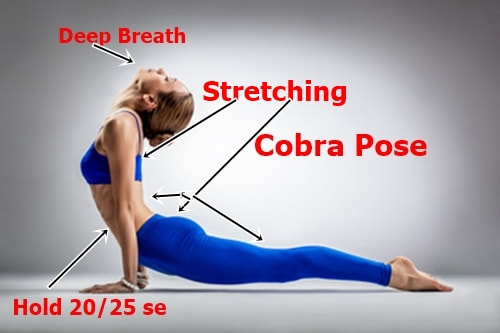
***3. Cobra Pose:
How to practice Cobra Pose:
Step 1: Lie prone on the floor. Stretch your legs back, tops of the feet on the floor. Spread your hands on the floor under your shoulders. Hug the elbows back into your body
Step 2: Press the tops of the feet and thighs and the pubis firmly into the floor.
Step 3: On an inhalation, begin to straighten the arms to lift the chest off the floor, going only to the height at which you can maintain a connection through your pubis to your legs. Press the tailbone toward the pubis and lift the pubis toward the navel.
Step 4: the shoulder blades against the back, puffing the side ribs forward. Lift through the top of the sternum but avoid pushing the front ribs forward, which only hardens the lower back.
Step 5: Hold the pose anywhere from 20 to 25 seconds, breathing easily. Release back to the floor with an exhalation.
Benefits of Cobra Pose:
Stretches muscles in the shoulders, chest, and abdominal, Decreases stiffness of the lower back, Strengthens the arms and shoulders. Increases flexibility, Improves menstrual irregularities, Elevates mood. Stimulates organs in the abdomen, like the kidneys Relieves stress and fatigue. Opens the chest and helps to clear the passages of the heart and lungs. Improves circulation of blood and oxygen, especially throughout the spinal and pelvic regions, Strengthens the spine, Helps to ease symptoms of asthma.
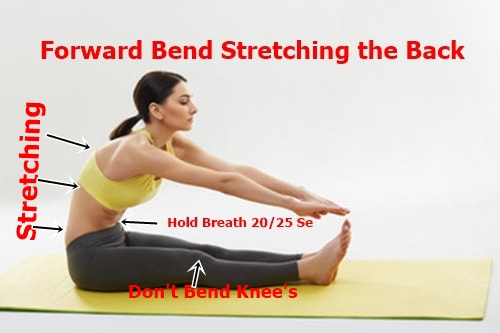
***4.Seated Forward Fold:
How To Practice:
Sit on the floor with your legs extended in front of you. Flex your feet. Sit up tall with a straight back. Bending from your hips and keeping your flat back, fold your upper body over your lower body. If you are able to, grab onto the outside of each foot, or your ankles or shins. Release your neck and let your head hang heavy. Hold for 20–25 breaths. Feel free to bend your knees until your back lengthens and you can tip your pelvis forward, keeping your spine long and flat is more important than keeping your knees perfectly straight.
Benefits:
It helps Nervous system and blood circulation
Calms the brain and helps relieve stress and mild depression
Stretches the spine, shoulders, lower back, and hamstrings
Stimulates organs including intestines, kidneys, liver, ovaries and uterus
Helps relieve symptoms of menstrual discomfort.
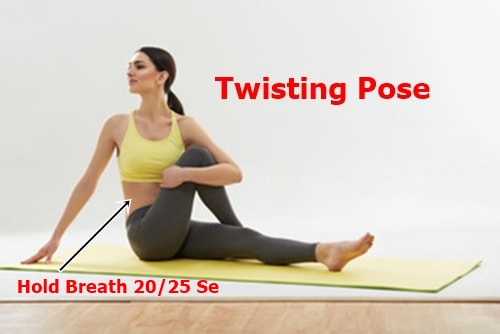
***5 Twisting Pose:
How To Practice Twisting pose:
Sit on the floor& Fold your right leg and place it on the floor in such a way that your foot rests on the floor.
Lift up your left hand and rest it against your right leg and twist your body towards the right-hand side.
Rest your other hand on the floor. Remain steady in this twisted position for 30 seconds and then release.
Repeat on the other side as well.
Benefits of Twisting Pose:
This Twisting pose gives a good stretch to your body, spine, legs, and hands. It keeps you away from minor backache problems. It keeps you away from neck problems as well. It increases your lungs’ capacity and improves your digestive system as well.
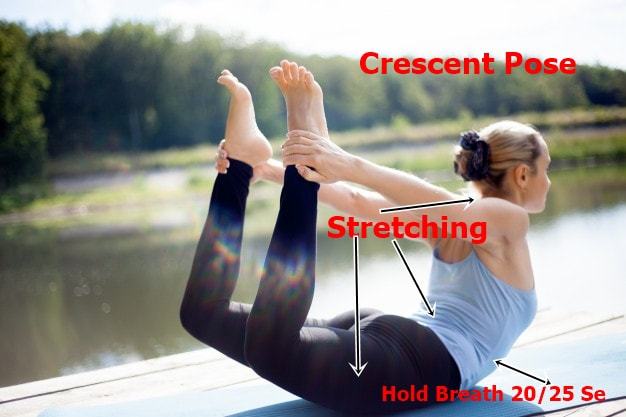
***6. Crescent pose:
How To Practice Crescent pose:
Lie down on the floor on your belly. Place your hands beside your chest on the floor, palms facing down.
Keep your legs straight and place the upper part of your feet on the floor. Bend your legs, your knees, and lift in the upward direction.
Hold your legs with your hands and stretch them. Also, lift up your chest in the upward direction. Remain steady in this pose for 30 seconds and then release.
Benefits of Crescent pose:
It stretches and strengthens your spine, belly organs, thighs, legs, ankles, arms, and shoulders. It stimulates your abdominal organs and also helps in improving blood circulation in your chest and heart. It even acts as a kick start mechanism for your thyroid and thymus glands.
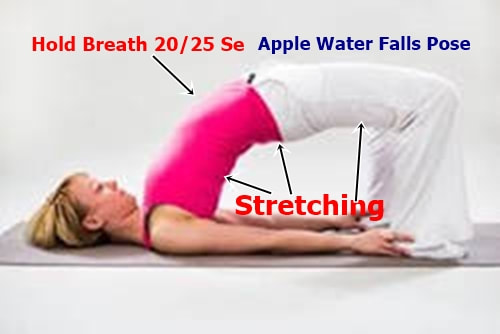
***7.Apple Water Falls Pose:
How to Practice Apple Water Falls Pose:
(A). Lie on your back with your knees bent and feet on the floor. Extend your arms along the floor, palms flat.
(B). Press your feet and arms firmly into the floor. Exhale as you lift your hips toward the ceiling.
(C). Draw your tailbone toward your pubic bone, holding your buttocks off the floor. Do not squeeze your glutes or flex your buttocks.
(E). Roll your shoulders back and underneath your body. Clasp your hands and extend your arms along the floor beneath your pelvis. Straighten your arms as much as possible, pressing your forearms into the mat. Reach your knuckles toward your heels.
(F). Keep your thighs and feet parallel — do not roll to the outer edges of your feet or let your knees drop together. Press your weight evenly across all four corners of both feet. Lengthen your tailbone toward the backs of your knees.
(G). Hold for up to one minute. To release, unclasp your hands and place them palms-down alongside your body. Exhale as you slowly roll your spine along the floor, vertebra by vertebra. Allow your knees to drop together.
Benefits of Apple water Falls Pose:
Stretches the chest, neck, spine, and hips, Strengthens the back, buttocks, and hamstrings, Improves circulation of blood. Helps alleviate stress and mild depression. Calms the brain and central nervous system. Stimulates the lungs, thyroid glands, and abdominal organs. Improves digestion, Reduces a backache and headache, Reduces fatigue, anxiety, and insomnia. Rejuvenates tired legs. Relieves symptoms of asthma and high blood pressure. Therapeutic for hypertension, osteoporosis, and sinusitis
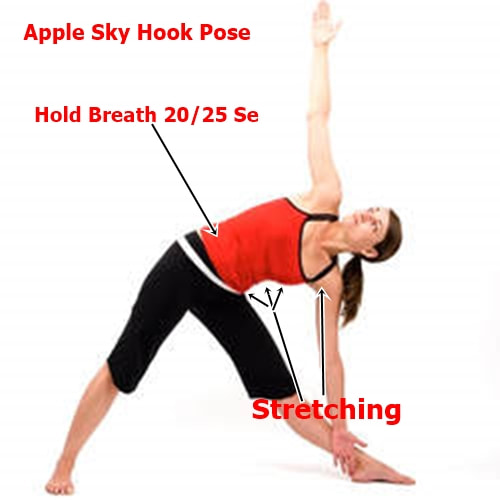
***8. Apple Sky hook pose:
How to Practice Apple sky hook pose:
Standing position with the legs maximum 3 feet or depend on your height apart as in Five Pointed Star, turn the right toes to the right wall and the left toes slightly inwards. Inhale and press the left hips out to the left as you slide both arms to the right parallel to the floor.
2. Exhale and rotate only the arms, raising the left arm up and resting the right hand against the right leg, with the palms facing forward.
3. Press into the feet, pull up the kneecaps, keeping the legs strong. Reach the fingertips away from each other, bringing the arms into one straight line with the shoulders stacked on top of each other. Press the left hip forward and the right hip back.
4. Breathe and hold for 20/25 Se breaths.
5. To release: inhale and reach the raised hand up towards the ceiling as you press down into the feet using the whole body to lift back into 5 pointed stars.
6. Repeat on the other side.
Benefits of Apple sky hook pose:
Apple Sky hook poses help for improving concentration and balance, as well as opening the body, which allows blood and oxygen to flow freely to all the organs. Next time you practice Apple sky hook pose, focus on keeping your side-body long and your chest open rather than collapsing downward. This keeps the energy flowing freely.
